The UNIX workstations which control the Varian NMR spectrometers are connected to the campus network, to allow data transfer to other computers, remote monitoring, and backups.
alvis.chem.uregina.ca controls the Varian
Mercury 300 MHz in LB311To minimize the risk of break-ins by cyber-vandals, a “firewall” restricts the data flowing into and out of the NMR workstations. These restrictions complicate communications with the NMR, but inconvenience is the price of security.
Technically inclined readers may be satisfied with the following summary of the firewall configuration:
uregina.ca as well as some which
might be used by Varian technicians.This rest of this document provides more detail about software you can use to connect to the NMR workstations as well as instructions for some typical activities:
You might be accustomed to copying files between computers using the FTP File Transfer Protocol, but because FTP is not encrypted, the firewall does not permit FTP connections to the NMR workstations.
So to transfer data, you need some utility that copies files via the secure shell protocol, and you need to connect from a computer that the firewall trusts.
The most straightforward way to transfer files between the NMR workstations and a Windows PC on campus is with the Secure Copy Client, WinSCP. If WinSCP is not already installed on your PC, you can download a copy preconfigured for use at the U of R from the UR Configured Software Suite, or you can look for a more recent release from the WinSCP home.
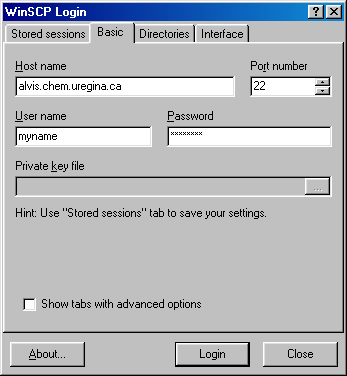
WinSCP provides a graphical interface for transferring files, similar to that provided by WinFTP. Here, for example, is what appears when you start the UR Configured WinSCP by selecting Programs→Urcomm→Secure Copy Client from the Windows Start menu, and then fill in the information required to connect to the Mercury 300 MHz workstation on WinSCP's Basic tab. Use the same userid and password as you do when sitting in front of the NMR.
After you click Login, you may see a scary message about the server's host key not being cached in the registry, which just means that nobody has ever connected to the workstation from your PC before. If you continue the connection, you'll see a panel that looks something like this (assuming that your WinSCP preferences remain set to the “Norton Commander” interface):
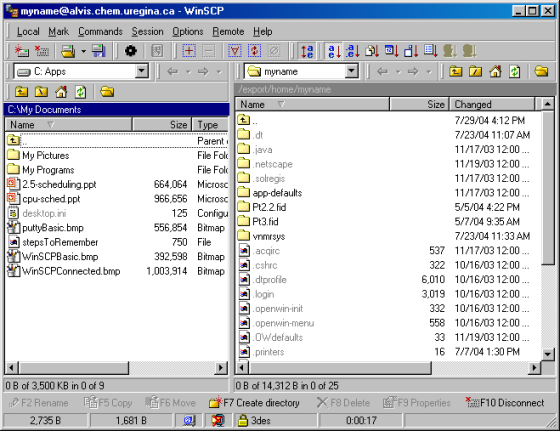
The left side of the panel shows files on the PC while the right side shows files on the NMR workstation. You can navigate through the filesystem by clicking on directory icons, as you are accustomed to doing in Windows. Dragging file icons from one side of the display to the other causes the files to be copied between machines; a dialog box prompts you for the attributes to be used for the newly created file. Or you can simply double click an icon to copy its file to the opposite side using default attributes.
(WinSCP has an alternate “Explorer-like” interface which shows only a single directory on the remote machine, but that view makes it harder to distinguish local from remote files).
To login to the NMR workstations from your PC, you'll
need to install a terminal emulator capable of SSH2. PuTTY
is a freely available possibility. PuTTY provides lots of
configuration options for you to explore, but you can log in
simply by running the putty program, filling in
the initial screen as indicated below (be sure to click the
SSH protocol choice instead of the
Telnet default) and clicking
Open.
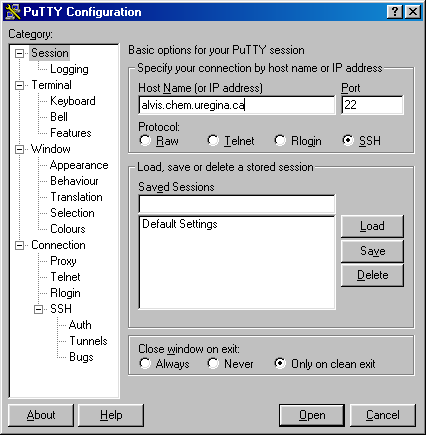
PuTTY will bring up a terminal window where you will be prompted for your userid and password on the NMR workstation.
Many people with email access at the University of Regina
have a UNIX account on telnet.uregina.ca.
Many have access to other UNIX machines as well. This
allows access to the NMR workstations from machines which
the firewall does not trust using a simple, albeit
inconvenient, trick: communicate in two hops through an
intermediate UNIX machine on campus (where you use the
techniques described in the next section).
Let's say you want to copy the file
periodic.tbl from your PC at home to
mesmer for a future experiment and also copy
the file elements.dat from mesmer
for analysis on your PC. Here's one approach:
periodic.tbl from your PC to
telnet.uregina.ca (or some other machine on
campus to which you have access).telnet.uregina.ca from your
PC.
From telnet.uregina.ca use sftp
to copy periodic.tbl to
mesmer.engg.uregina.ca, and then to copy
elements.dat from mesmer to
telnet.
(It is possible to avoid the double copy by setting up an an SSH “tunnel” through the intermediate machine, but that requires some potentially confusing configuration steps; look for references to tunnels in the documentation for your SSH program if you wish to explore this option.)
elements.dat from
telnet.uregina.ca to your PC.sftp or scpsftp
sftp provides an interface similar to the
ftp command, but uses SSH2 for
communication.
Here's a sample session, where you log
into alvis as user myname
from a machine called aufbau. Then you copy a file
named fid from the test.fid
subdirectory of your home directory on alvis to
your current directory on aufbau and copy
some.file from the current directory on
aufbau to your test.fid directory
on alvis. Bold face distinguishes the commands
you would type from the prompts the computer prints:
aufbau $sftp myname@alvis.chem.uregina.ca
myname@alvis.chem.uregina.ca's password:
sftp> cd test.fid
/export/home/myname/test.fid
sftp> ls
.:
fid
log
procpar
text
sftp> get fid
fid|  94kB |  94kB/s | TOC: 00:00:01 | 100%
sftp> put some.file
some.file|  449B |  449B/s | TOC: 00:00:01 | 100%
sftp> quit
If you type help at the sftp prompt, it responds with a list of all of its commands.
scp
scp works like the normal UNIX file copy
command cp, except that you can prefix a
filename with a machine name followed by a colon, to
indicate that the file is on another computer. Here is an
example of copying the file fid from the
test.fid subdirectory of your home directory
on alvis to the directory dest on
a machine named aufbau.
aufbau $scp alvis.chem.uregina.ca:test.fid/fid dest
myname@alvis.chem.uregina.ca's password:
fid| 94kB | 94kB/s | TOC: 00:00:01 | 100%
(There may still be a few UNIX machines on campus where the scp
command defaults to version 1 of the SSH protocol. These
machines provide version 2 with the
command scp2).
If your userid is different on the two machines, you can include the remote userid before the remote machine name, separated by an at-sign:
aufbau $scp myname@alvis.chem.uregina.ca:testfid.fid/fid dest
myname@alvis.chem.uregina.ca's password:
fid| 304kB | 304kB/s | TOC: 00:00:01 | 100%
If the remote files are not in your home directory, you can specify a complete path beginning with the root directory:
aufbau $scp alvis.chem.uregina.ca:/export/home/jane/fid dest
myname@alvis.chem.uregina.ca's password:
fid| 304kB | 304kB/s | TOC: 00:00:01 | 100%
You can copy all the contents of a directory with
scp's -r (for
“recursive”) option:
aufbau $scp -r alvis.chem.uregina.ca:test.fid dest
myname@alvis.chem.uregina.ca's password:
text|   15B |   15B/s | TOC: 00:00:01 | 100%
procpar|  14kB |  14kB/s | TOC: 00:00:01 | 100%
fid|  94kB |  94kB/s | TOC: 00:00:01 | 100%
log|   92B |   92B/s | TOC: 00:00:01 | 100%
To log into an NMR workstation from a UNIX computer on
campus, just run the ssh command, supplying
your userid on the NMR workstation together with its
hostname:
aufbau $ssh myname@alvis.chem.uregina.ca
myname's password:
Authentication successful.
Last login: Thu Jul 29 11:18:38 2004 from wiglaf.lcd.ureg
Sun Microsystems Inc.   SunOS 5.9       Generic May 2002
Enter your password when prompted for it, and you will be logged in.
(There may still be a few UNIX machines on campus where the ssh
command defaults to version 1 of the SSH protocol. These
machines provide version 2 with the
command ssh2.)